How to Make Your Own
Scrapbooking Background Paper
by Sunday Lamdin
 Here
is a great way to make your own background papers!
I
found some collections of stamps in little bags in a local charity
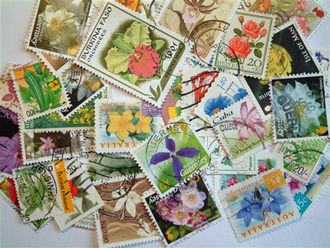
shop. This collection is of lovely colourful flowers from around the
world.
I wanted to use the stamps on a layout, but wanted to place them on more
than one layout,
so I decided to use them as a background for one
of the pages in a "hanging concertina (Accordion) Album" that I
was making (so the pages were about 4" square).
After soaking the stamps off their backings and drying them (see below), I
arranged them all on a piece of paper and then placed a sheet of acetate
over the top and flipping it all over carefully, placed it on my scanner
and took a full colour scan of the stamps. (If you don't have a scanner... see note at the end)
 The
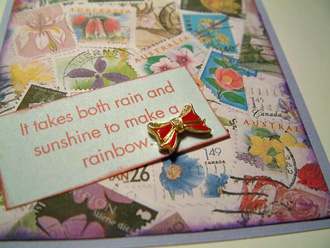
result was a reusable and very colourful background paper about 6x6"
in actual size. Of course you can do this with anything, such as labels,
tickets, menus, timetables, etc. Just make a pleasing collage and then
scan it in (or just colour photocopy it).
And then you can have a background that is unique to you. It's helpful to
do this if something you want to include in a layout is actually bound
into a book that you don't wish to destroy. Just use the same method. Scan
it in, or just photocopy it and then make a collage by positioning your
other items over the scanned image, then rescan with all your other items
in place if necessary.
Of course, unless you have a large format printer, these backgrounds will
be for A4 (up to 8x8") maximum, but you can always use the image as a
mat on a 12x12!
Oh and by the way... the little bow embellishment... is one of a pair of
earrings. I cut off the stem at the back and it makes a lovely
"quality" embellishment!!
Cleaning the backing off used stamps
Now
amazingly enough… my husband’s experience as a stamp collector when he
was a boy, came in handy for this. He knew that to get the stamps off
their envelope backing I needed to place them into a bowl of hot water
(hand hot, don’t start boiling the kettle!! LOL!) and they would peel
off!
Hey… what satisfying fun! I did just that - put them in the hot water,
waited for a while (only a few minutes) and then was able to easily peel
the stamps from their moorings. Some of them fell away by themselves.
They were then laid on some kitchen roll on a tray to dry.
Of course as they dried they curled a little bit, but then I (and my 4
year old daughter) laid them out on a sheet of A4 paper, put another piece
on top and then, after placing them between two scrapbooking magazines, I
tucked them underneath a big pile of my daughter’s books!
I left them for a while (over night should be enough) and I then had
lovely flat colourful flowery stamps to use.
NOTE: If you don't have a scanner at home, try taking a close-up photograph (use the macro setting on your camera if it has one) - get in really close and fill the whole frame with your homemade background and then load onto your computer and print the picture out large enough to made your background paper.


